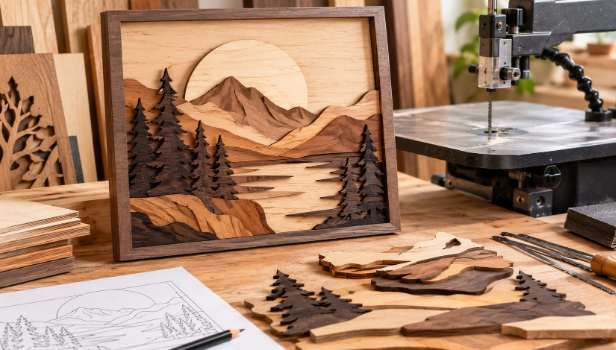
Woodworking and visual art often overlap, but few techniques demonstrate that connection as clearly as layered wood art. Instead of relying on a single flat surface, this approach combines individually cut pieces to create depth, shadows, texture, and visual movement. The result can range from geometric wall panels to portraits, landscapes, signs, and highly expressive decorative compositions.
Start With a Strong Design
The foundation of a successful layered wood art is a design that can be separated into distinct visual levels. Before cutting, consider which elements should appear in the foreground, middle ground, and background. Simple shapes are often easier to assemble, while intricate designs require careful planning to ensure that narrow sections remain strong enough after cutting.
Digital drawings, photographs, illustrations, or hand-drawn patterns can all inspire. A complex image can be divided into separate shapes, with each shape assigned to a particular layer. This process turns a flat reference into a dimensional composition.
Choose Wood for Both Appearance and Stability
Wood selection affects more than the final colour. Grain direction, thickness, density, and surface quality can influence how easily individual pieces can be cut and how they look after assembly. Thin plywood is useful for detailed designs because it can provide relatively consistent thickness, while solid hardwoods can introduce distinctive grain patterns and natural variation.
Combining different wood tones can also create depth to layered wood art without relying heavily on paint. Lighter pieces may visually advance, while darker wood can establish recesses and shadows. Paying attention to grain flow is particularly important because grain can either reinforce or distract from the shape of a design.
Use the Scroll Saw for Detailed Shapes
A scroll saw is particularly useful when a project contains curves, interior openings, and intricate outlines. For enclosed sections, a small entry hole can allow the blade to pass through the material before making the internal cut. Cutting these interior sections before the outside profile can help preserve the workpiece while the design is still supported.
Blade selection also matters. Thin materials and tight curves generally benefit from blades that provide greater control, while thicker stock may require a different blade size. Cutting just outside a pattern line and refining the edge through sanding can also help maintain accuracy.
Build Depth Through Layering
Once the individual components are cut, the arrangement determines how dimensional the finished layered wood art will appear. Layers can be stacked directly or separated slightly to create stronger shadows. Different thicknesses can also produce elevation changes, allowing selected elements to visually stand forward.
Stack cutting can be useful when multiple matching components are required. Several pieces can be secured together and cut simultaneously, reducing repetitive work while helping produce consistent shapes. Properly securing the material is essential so that the layers do not shift during cutting.
For more advanced layered wood art, power carving can be introduced after the main pieces have been cut. Carving can soften transitions, add texture, refine contours, and create additional relief. This combination of precise cutting and controlled material removal can make a project feel more sculptural rather than simply assembled.
Conclusion
Creating dimensional woodworking requires a balance between design planning, accurate cutting, material selection, and thoughtful finishing. Layering allows relatively simple wooden components to become visually complex without requiring every detail to be carved from one solid block.
For makers exploring abstract wood sculpture, layered construction provides another way to experiment with negative space, colour, grain, height, and shadow. The most effective projects do not necessarily contain the greatest number of pieces; instead, they use each layer purposefully to guide the eye and strengthen the overall composition. With careful planning and controlled cutting, this technique can turn a flat concept into a tactile piece of woodworking art.



Most Commented Posts